The Scriptum Blog / Stationery
Thank You Cards and the Dreaded Thank You Loop
We all know that slightly flat feeling when you have spent time, money, and above all, effort on choosing a present which you know is utterly perfect for someone, but you haven't seen them open it. We've all been on the other side too - received a gift which has touched us ("I can't believe she remembered I wanted this!") but have had to restrain our visible enthusiasm lest Auntie Myrtle realise her Twix mug wasn't quite as thrilling as that incredible compass globe from cousin Althea. It's polite to write a thank you card for any present, but the really thoughtful ones truly deserve it. So, whether it's a dutiful note for a gesture gift or a heartfelt thank you for a long-desired treat, here are our four simple rules for the perfect thank you letter:
1. Be prompt. The acceptable length of the note is proportional to the time you've taken to send it. A couple of lines within a week of receiving a present is perfect, while if you leave it longer, you should really write at more length and detail to justify how long it has taken. And let's face it, the longer you leave it, the less likely you are to write it at all.
2. Be specific. Saying "thanks for the present" sounds like (and probably means) you can't quite remember exactly what they got you. Telling the giver how you have used/will use the item they got you is a nice way of letting them know you appreciate the qualities of the present.
3. Draft it. A two minute scribbled draft will help avoid repetition of fulsome adjectives ("lovely" sounds a bit disingenuous when it has been used three times in a row) and also prevent spelling mistakes and messy crossings out. It doesn't have to be a masterpiece of world literature, but coherence and elegance are always worth aiming for.
4. Handwrite it. Even though it puts my views at odds with the über arbiter of etiquette, Debretts, who suggest that an emailed thank-you is sometimes acceptable, to me they will always look like you are just filling a dull 5 minutes at work, and frankly aren't worth the cyberspace they're written on. A spontaneous text at the moment of unwrapping is all well and good, but the rarer it becomes to write by hand, the more appreciated proper handwritten thank you cards become.
Some examples...
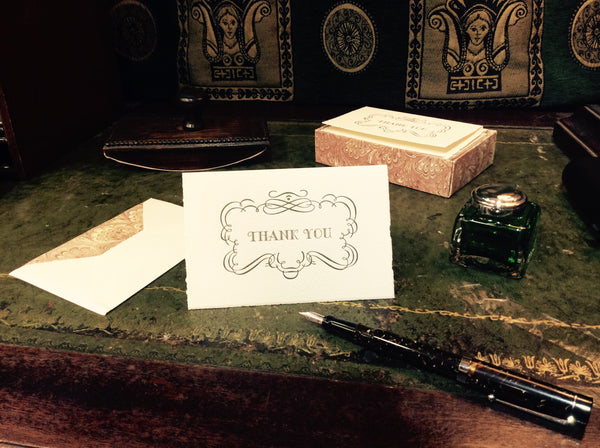
The dutiful note with draft, written the day after receiving the present:

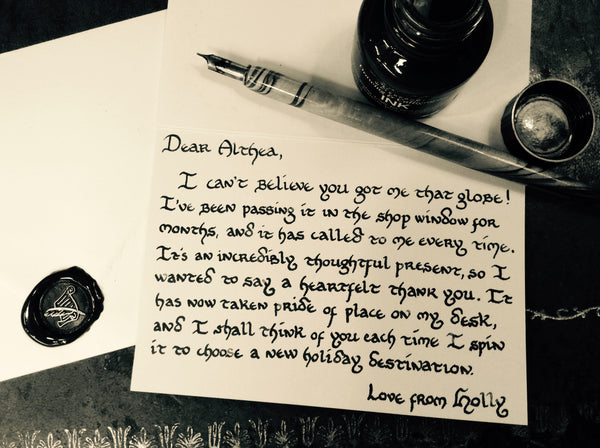
The sincerely grateful note, written after a week:
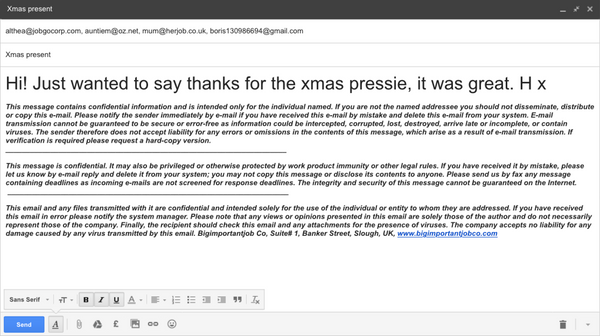
The "I don't care about your present or you" email:
A word of caution to end on - never write a thank you card for a thank you card. This kind of gratitude one-upmanship is not only in poor taste, but can lead to the dreaded thank you loop. If you have friends who are also stationery addicts, it is disturbingly easy to become trapped on a Möbius strip of thank you notes, thanking them for thanking you, and receiving thanks for your thanks of their thankfulness.
The dreaded thank you loop

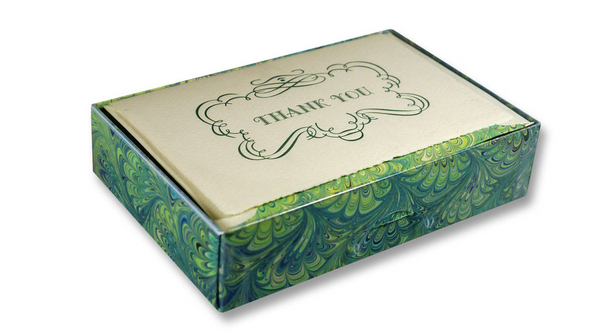
Once entered, the thank you card loop can only end in bankruptcy, madness, or death (or more realistically, repetitive strain injury in your writing hand). Having said that, if you insist on engaging in competitive gratitude, you can break the loop by sending a thank you card so magnificent that no reply is possible... so get these ones, and follow the four thank you card rules. You'll win every time.
Letterpressed Thank You Card Set
Of shoes and ships and sealing wax
If you were really expecting to read about shoes and ships (or cabbages and kings, for that matter) you will be sadly disappointed. This post is about the sole item above which falls into our immediate realm of expertise - sealing wax.
We sell a lot of it. Perhaps it's the novelty value, perhaps it's because there really is no better way to feel like an Austen heroine or a character from Dickens than actually sealing a letter. All the sealing paraphernalia looks wonderful on a desk, and while no-one actually needs to seal anything these days, the look on a friend's face when presented with a gloriously sealed invitation is enough motivation for even technophiles to try it.
A brief history of sealing wax
In the middle ages, when illiteracy was rife, wax seals were commonly used for things we would use a signature for today, such as authenticating a will or contract - the symbol or crest on your own individual seal guaranteed your identity and integrity, and your acknowledgement of the contents. Some medieval clergymen are reported to have plucked out their own beard hair and added it to the melted wax, to show that the seal was truly a part of them! 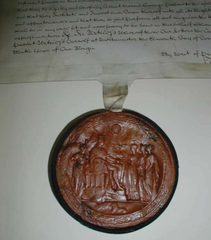
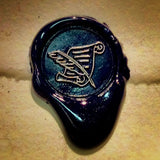
Back then, sealing wax itself had a very different makeup to the kind we use now (even discounting beard hair). It was made principally of beeswax and Venice turpentine, then coloured with various pigments, commonly vermilion or cinnabar to give a red colour. Seals were sometimes melted directly onto the document, but just as often hung off documents with ribbon or parchment tags, like the example on the right.

From the 13th century, as people became both more literate and more mobile, sealing wax began to be used less extensively for authentication and more for security and privacy. Letter-writing grew more common, and when paper was still an expensive luxury, people folded their letters so that the reverse side, held shut by a blob of sealing wax, formed the envelope. It was even perfectly normal to cram your writing onto every available blank space still showing on the outside of the letter - paper really was that expensive.
The wax itself now needed to be more brittle than it had been previously, so as to show clearly if someone had tampered with a letter. This meant the composition of the sealing wax had to change away from the malleable beeswax mixture used on medieval documents. From the 16th century, shellac, a reddish natural resin secreted by tiny insects in Thailand and India (see left) became known in Europe, and was speedily mixed with the Venice turpentine and pigment to make sealing wax instead of beeswax.
When some genius invented the gummed envelope in the 19th century, wax seals slipped away from the practical into the decorative - while still retaining their medieval function of proving identity. Although they are still sometimes used in the legal profession, modern seals tend to be either purely decorative or an expression of personality; you can tell a lot about someone by whether they choose a rearing stallion, a delicate butterfly or a elegant fleur-de-lys to represent themselves. Still, the addition of a wax seal to a hand-delivered card does always lend a certain elegance and dignity to the contents, whatever they may be.

Our wax
The wax we stock is made by the French stationery company J. Herbin. As nowadays people also tend to use wax more for aesthetic than practical purposes, we sell the traditional, brittle version of their sealing wax (you can find more details about its composition here, if all this talk of insects and beard hair has disturbed or intrigued you). We like this particular type of wax as it has a beautifully glossy finish, and gives a crystal clear impression of the seal image, so every tiny detail is rendered crisp and true. It is wonderful for decorative use on correspondence, certificates and wrapping, and almost anything else a creative mind can conceive. Scriptum's director used a beautiful custom-designed wax seal to decorate all sorts of things at his wedding, including making napkin rings from hand-marbled paper held together with a seal.
Wax sealing tips
Actually using sealing wax can be a tricky business if you've never tried it before. So, with all the usual caveats you would expect when giving advice for (quite literally) playing with fire - for heaven's sake, children, don't try this at home, and adults, proceed with care and caution and possibly even a small fire extinguisher - here are our handy hints for wax sealing.
- Place the envelope (or other item) you want to seal in the centre of your work surface. For more accurate results, you can draw lightly in pencil round the metal seal stamp where you would like the seal to go on the envelope. Have your wax and seal stamp to hand.
- Pour methylated spirits into the burner until it is a quarter full, and light it. Take the stick of wax, and holding it slightly to the side of the burner flame, melt it gently. Using the stick of wax as a pointer, direct the dripping wax to where you want the seal. You can use the end of the wax stick to stir the puddle of wax to shape it and get rid of air bubbles - this also helps the liquid wax to achieve a uniform consistency.
- Once the liquid wax covers about the area of a ten pence piece, and you are satisfied with the shape of your little puddle, calmly put the stick of wax aside on a non-stick surface (it will still be tacky from melting, don't put it directly on the table!) and put out the burner. The wax puddle is less likely to stick to the seal stamp when it has had a few seconds to become less liquid, so don't rush this bit. It also helps prevent sticking if at this stage you breathe lightly over the wax to create a barrier of moisture between the wax and the seal stamp.
- Check your seal stamp is the right way up, and press it firmly and decisively into the wax for a few seconds. Now leave the wax for a few minutes to harden completely, and your seal is done!
- For an even more beautiful effect, use a sponge to dab some gold or silver ink from an inking pad lightly over the seal to make the image stand out from the background.
- If you are doing multiple seals, allow the metal of the seal stamp to cool between each use, otherwise the wax will start sticking to it. But even if disaster strikes and the wax adheres to the seal rather than the paper, don't panic - a soaking in nail varnish remover will get the wax out of even the most fiddly cracks in a metal seal stamp's design.


- For a detailed history of all manner of stationery, consult the thoroughly informative Pen, Ink & Evidence by Joe Nickell (Oak Knoll Press, 2003).
- For a proper scholarly view of all aspects of sealing in Medieval times, see Good Impressions: Image and Authority in Medieval Seals, British Museum Research Publication 168.
- For an entymologist's-eye view of sealing wax, read the intriguing Fireflies, Honey & Silk by Gilbert Waldbauer (University of California Press, 2010).
In the workshop with Bomo Art in Budapest